
Above ground pools use a vinyl liner that is capable of lasting many years under the pressure of the water. Nevertheless, after some years of consistent water pressure deterioration on this liner is likely to occur. Factors that lead to the wearing out of above ground pool liners include chlorine and sunlight exposure.
There might also be something that punctures the side or the bottom of the pool and causes leaks. The good news is that these pools come with a repair kit that includes patching materials. With simple DIY patching, you can stop the leak without draining the water.
Dangers of swimming pool leaks
•Pump system faults
The appropriate water level in most pools is 66 % above the skimmer assembly. This water stature allows the skimmer inlet system to push the water to the filter, the cooling unit, and the heater.
If a pool leak lets the water level to drop below the skimmer inlet line, that could hurt the whole pump framework. The skimmer inlet will suck in air, rather than water. Eventually, the entire system will overheat and shut down.
•Chemistry imbalance
A pool leak will eventually interfere with the pH levels of the water. The right pH level is maintained by acidity and alkalinity in the pool, and that helps to improve its sanitation standards.
That is why we add chlorine to the pool to keep the water. Alkaline components are also added to neutralize the excess acidity so that chlorine doesn’t hurt swimmers.
When there is a leak in the pool, the chlorine leaks out of the pool with the water. That can gradually lead to filthy water that encourages algae growth. The chlorine may hurt nearby plants when the leaked water absorbs in the ground.
•Weakened skimmer assembly
A weakened skimmer assembly leads to pool leaks. This is a part of the pool that takes in the trash and keeps it out of the filters need to function and maximum capacity to circulate the water in the pump.
It’s essential to fix pool leaks that keep the water level underneath the skimmer before turning on the pump.
•Plumbing leaks
Your pool has a plumbing system that is part of the suction line. The skimmer is also made up part of this inlet with a suction line. A break in these underwater pipelines can prompt critical issues with the pool pump.
A wet ground or water on the deck might be the signs of a plumbing leak. It’s possible to fix a large portion of these breaks without draining the water or tearing up the ground. The pipes framework must work proficiently for a clean pool.
You also need to check the return line and repair cracks to prevent a leak. A broken return line will suck dirt into the pool.
How to find out if you have a pool leak
In many cases, a pool leak can be big enough to be perceivable by water level checks. In some instances though, pool owners might remain in the dark for long before noticing the leak.
If you notice signs such as green growth in the water in spite of regular chemical treatment, separated skimmer boxes, cracks in the pool deck or damp areas around the pool, you should conclude without a doubt that you have a pool leak.
Testing for a pool leak
You can carry out a DIY test to check whether water loss in the pool is more than the amount caused by evaporation. This test can also help you spot the source of the leak. Place a 5-gallon container in the water on the second step of the pool. Fill the can with water so that it is the same height as the pool’s water level.
Turn off any recirculating pumps and wait for 24 hours. Compare the water level in the pool versus the 5-gallon plastic container. If the pool water level has receded more than the water level in the container, there is likely to be an underground leak.
What is causing the leaks?
Discovering the hole in the pool can be hard. However, the leak must be found and fixed to prevent water wastage and chlorine pollution in the nearby surroundings. There can be many causative factors for pool leaks, but for above ground pools, the main one is wear and tear of the vinyl lining.
When a sharp object hits the side/bottom of the pool, they can cause a tear in the vinyl surface. Vinyl tears are easy to patch up, but ensure to do so quickly to prevent the hole from enlarging. Speed is essential when repairing pool leaks to stop the other damages and problems earlier discussed.
Fixing the leak
You will need to have a few tools to complete the leak repair. Below is
- Vinyl patch kits
- Rubbing alcohol
- A piece of cloth
Step 1: Find the area of the leak
If you establish that your pool is losing water, turn off the filtration system and note where the water quits dropping. Remember that vinyl liner pools need to be filled with water all the time. For that reason, if you shouldn’t let the water level fall to extreme levels. The good news is that once you identify the area of the leak, you can repair it with the water still in the pool.
Step 2: Get your vinyl liner repair kit ready
Find a patch material that matches the shade of your current liner in the case have options in your patch material kit. If the leak is underwater, you can use a wet patch kit. Lean around the gap with a fabric.
There are many types of patch kits available in the market. The key things to look for when acquiring a patch kit include a patching material and vinyl adhesive. Some patch kits come with an applicator for the glue to avoid making a mess when using it. Vinyl patching materials come in different colors. Choose a patching a kit that states it can be used underwater.
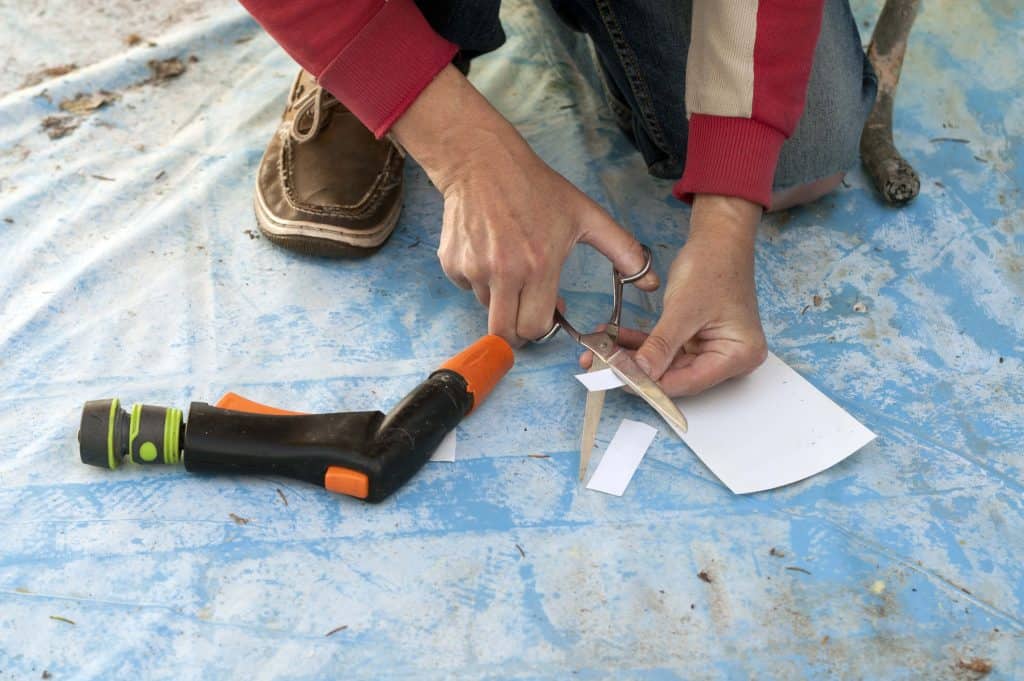
Step 3: Cut the patch material
Cut the patch material to size 2 inches larger than the circumference of the tear. By making the patching material bigger than the crack, it allows enough surface for the glue to cover the crack and hold.
Trim the edges of the patching material to give it round corners. A square edge or angle on the fix is bound to tear away or come free from the liner.
Step 4: Clean the leaking hole
Clean the area of the liner where you’re applying the patch using rubbing alcohol or a mild solvent. Wipe a region about 3 inches further around the hole to remove dirt and debris that could keep the bond from staying. Removing algae growth and dirt from the area helps to improve the chances of the patch sticking on the hole.
During the cleanup, slightly open the crack by raking a screwdriver around the edge of the hole. Next, use a wire brush to rake up all algae, dirt and loose material. Clean these with a piece of clothing and apply to rub alcohol directly on the crack.
Step 5: Apply adhesive on the patch material
Apply glue from the pool repair kit on one side of the patch following the manufacturer’s instructions. Do this while over the water line. Fold up the patch piece with the glue when your hand is in the water until you get close the tear.
Step 6: Cover the crack
Unfold the patch and fix it over the crack, covering every single torn edge. With your fingers, push the patch from the middle to the sides to include all air bubbles until every loophole is sealed. Hold the piece in place for one moment.
If the leaking hole is on the wall, you will need to patch the outside of the pool after patching the inside. Use the same size patch material as the one before.
Step 7: Give it time to adhere
Find out from your repair kit’s instructions how long it would take for the patch to permanently stick. Usually, you will need to inspect it after 48 hours to ensure that it’s holding. It may take a week to fully adhere.
Some patch manufacturers recommend adding weight on your patch for 24 hours so the adhesive cures correctly. Putting pressure on a pool wall can be impossible. But if your patch piece is on the pool floor, rest a clean brick wrapped in a plastic bag on top of the patch.
If the patch starts to pull up, add a little adhesive around the edges and smooth them back down. You can also double-patch by adding a new patch over one that’s starting to give out.
Important to remember
Keep sharp thing such as dishes or stepping stools off the path of the liner. Do not use tape to fix a pool liner. It cannot withstand the pressure of the water and will eventually give way, causing other problems.
Pool patches are not a permanent solution. Eventually, even properly patched up swimming pool liners will deteriorate. Learning how to patch the pool liner will buy you some time to get a replacement liner so that leaks do not destroy the pool components.
